How to use 3D Juump Ace to export images of 3D parts and assemblies.
In this video tutorial, learn how to export images to .jpeg, .bmp or .png in order to illustrate a presentation, a pdf or a parts catalogue. Also, see how to change the background color or make it transparent.
Tutorial in French with English subtitles.
User Guide:
4.3.1 - Export tool

Export tool – formats
Vectorial export tool: Export digital images created through a sequence of commands or mathematical statements that place lines and shapes in a given two-dimensional or three-dimensional space
Bill Of Material export tool: Export a list of the available metadata
3D data export tool: Export data that provide depth perception
4.3.1 - Export image tool (IMG)
In the Export image tool (IMG), the user can modify export options.
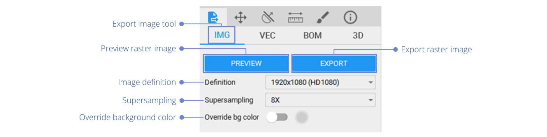
Export raster image
Preview raster image: Enables the user to visualize the applied criteria before exporting a raster image.
Export raster image: Allows the user to directly export a raster image (bitmap) in PNG, JPG or TIFF format Image export shows parts effectively loaded in the 3D view.
Image Definition: Output size of the raster image
Supersampling: Number of samples per pixel (larger value = better quality)
Override background color: When the option is selected, edit the background color for the export only
Remove background color: When the option is selected, edit the background transparency