How to make cutting planes on 3D parts with 3D Juump Ace
In this video tutorial, learn how to make cutting planes on 3D parts. The basic cutting plane on the 3 planes X, Y and Z, the quarter cut, the section. See how to make a box to introspect the 3D scene. Learn how to produce technically illustrative images in order to visualize the parts within a complex set.
Tutorial in French with English subtitles.
User Guide:
4.3.3 - Cut plane editor
The Cut plane editor enables the user to create and edit cut planes.
Users can move and rotate cut planes freely within the scene and the set of parts which get cut through can be specified individually for each cut plane.
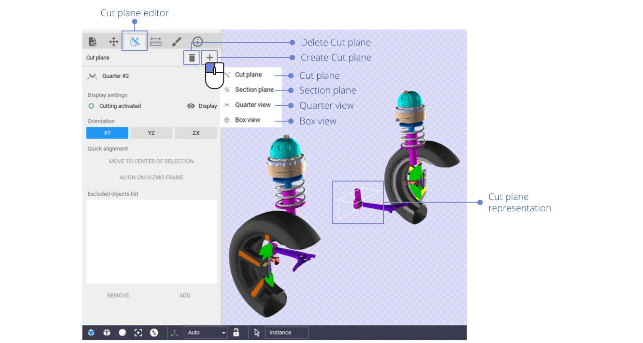
Cut plane representation: Graphical representation of cut planes in the 3D view.
Cut planes are graphically represented by squares or rectangles in the 3D view. The user can interact with these representations in order to select, move or rotate cut planes. Each graphical representation of a cut plane can be enabled or disabled from the Product structure view (see Section Applications data).
4.3.3.1 - Creating and deleting cut planes
To create new cut planes, click the Create Cut plane button in the Cut plane editor. A pop-up menu appears, offering the option to create either a single cut plane or a compound of cut planes:
- Delete cut plane: Manage cut plane, to delete the selected cut plane.
- Create cut plane: Manage cut plane, to create a new cut plane.
A left click on the + creates a new cut plane via a context menu:
- Cut plane: Create a single cut plane performing a full section of the geometry.
- Section plane: Create a compound of two parallel cut planes isolating the geometry between them.
- Quarter view: Create a compound of two orthogonal cut planes performing a quarter section of the geometry.
- Box view: Create a compound of six cut planes forming a box.
The created cut plane(s) are restricted and aligned to the currently selected parts. If the selection is empty when creating a new cut plane, it aligns with the current world orientation and all parts are cut through.
To delete an existing cut plane, another option is to select it from the product structure as explained in the Section Applications data.
4.3.3.2 - Moving cut planes in the 3D view
The position and the orientation of a cut plane can be edited from the 3D view.
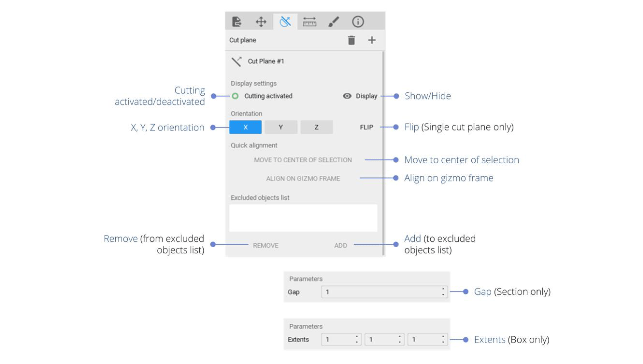
Display settings:
Display settings:
- Cutting activated/deactivated: Activate or deactivate the cut plane; when deactivated, a cut plane has no effect on the geometry of parts.
- Show/Hide: Display or hide the cut plane graphical representation in the 3D View.
Orientation:
- X/Y/Z orientation: Select along which axis (x, y or z) the normal of the cut plane is aligned.
- Flip (Single cut plane only): Flip the normal of the cut plane.
Quick alignment:
- Move to center of selection: Center the cut plane and the current selection of parts.
- Align to gizmo frame: Fix the orientation of the cut plane so that it align with the current frame. The current frame depends on the frame mode (see Section Frame mode selector) and on the currently selected parts.
Excluded objects list:
- The Excluded objects list is the list of the parts that shall not be cut by the cut plane by default.
- Remove (from excluded objects list): Remove the selected parts from the list of objects getting cut.
- Add (to excluded objects list): Add the selected parts to the list of objects getting cut.
Section parameters:
- Gap: Set the distance value between the cut planes that define the section.
Box parameters
- Extents: Set the dimensions of the box