How to use 3D Juump Ace to export images of 3D parts and assemblies.
In this video tutorial, learn how to perform measurements on or between parts. Discover the different measurement techniques (edge, cylinder, center to center…)
Tutorial in French with English subtitles.
User Guide:
4.3.4 - Measurements
The Measurements tool allows the user to perform various types of measurements. By default, the Measurements tool is used to locate geometric features and their dimensions. All measurement values are indicative and non-contractual. All reported values in the measurements tool have limited accuracy due to floating point round-off errors and tessellated surfaces approximation. When assessing measurement errors, the input data is considered to be absolutely precise. In most cases, however, the input data is subject to floating point round-off errors, resulting from inaccuracies in geometric transformations or locked for those source file data format. Thus, any measurement error computed by 3D Juump Ace may differ from its actual value.
4.3.4.1 - Measure item
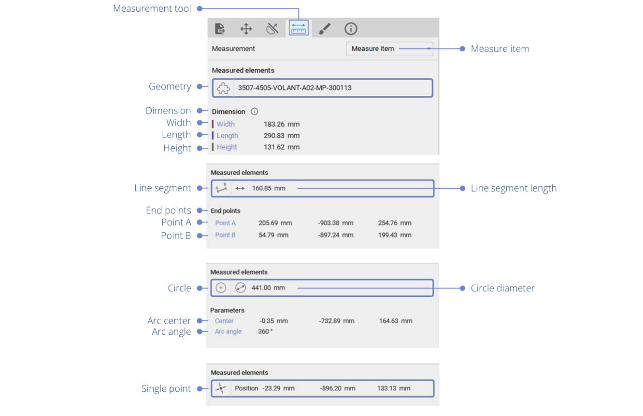
When the Measurement tool is active in the 3D view, left-click on an object to select it. Toggle the Measure item option to Measure item option to measure aspects of a single element.

- Geometry: Full geometry of a part.
- Dimensions: Box dimension providing the width, length and height.
- Line segment: Edge with the shape of a straight line on the surface of a part. Available measurements: length of the line segment
- Line segment length: Measurement from end to end of a line
- End points: Indicate coordinates of the original and destination points of the designated line segment
- Point A: Original point of the designated line segment
- Point B: Destination point of the designated line segment
- Circle: Edge with the shape of either a full circle or a circular segment on the surface of a part. Available measurements: diameter, angle measure of the arc and center of the circle
- Circle diameter: Measurement from end to end of the straight line passing from side to side through the center of a circle
- Arc center: Coordinates of the center of an arc
- Arc angle: Space measured in degrees between two intersecting lines of an element
- Single point: Salient point on the surface of a part. Available measurement: position of the point in the scene.
4.3.4.2 - Measure between
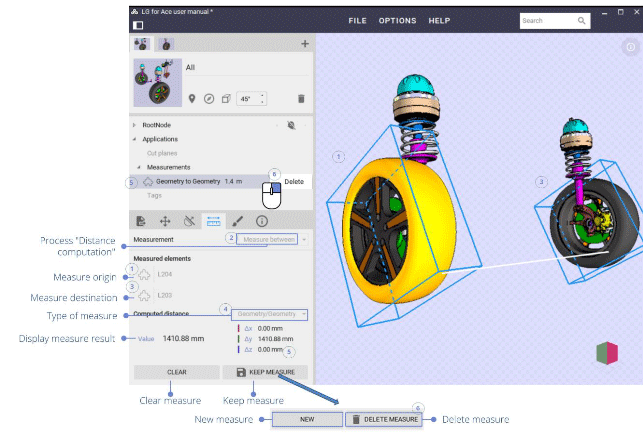
When the Measurement tool is active, left-click on an object to select it in the 3D view. Toggle the Measure between option to compute the minimum distance between the selected element and any other designated geometric feature (part, circles or single points).

- Process “Distance computation”: Activate/deactivate the Measurement tool
- Measure origin: Initiate the measure by selecting the origin element in the 3D view (either a geometry, a point or a feature)
- Measure destination: Close the loop of the measure by selecting the destination element in the 3D view (either a geometry, a point or a feature)
- Type of measure: Depending on the characteristics of the selected elements, several types of measure may be available to choose from. For instance, when one of the selected elements is a circle shape, it is possible to measure either from its center or from the nearest point on the circle.
- Point: measure to/from the selected point,
- Line: measure to/from the nearest point on a line,
- Center: measure to/from the center of a circle,
- Circle: measure to/from the nearest point on a circle,
- Axis: measure to/from the nearest point on an axis (the axis of a circle for instance),Plane: measure to/from the nearest point on a plane (the plane of a circle for instance),
- Geometry: measure to/from the nearest point on a geometry,
- Box: measure to/from the nearest point of a box (the bounding box of a geometry for instance).
- Display measure result: View the Measurement results
- Clear measure: Reset the previously selected measure(s) in order to proceed with a new measure calculation
OR - Keep measure: Save the result, it can be accessed later on from the Product Structure (Applications). Once the measure has been saved, Clear measure button toggles to New measure and Keep measure toggles to Delete measure.
- New measure: Proceed with a new measure calculation
- Delete measure: Delete the designated measure. In the Product structure, right- click on the designated measure to display a pop-up menu with the option to delete.


